
Do you want to BE a Roman Gladiator? Legionary? Centurion? General?
Senator? We've been living your dream for years!
Be the Hero!
Live the Dream.
![]()
![]()
![]()
![]()
![]()
![]()
![]()
![]()
SITE
INDEX
This site is best viewed at 1024x768
Look
for us on
Malice
the Webseries, a Phil Cook Eagle Films Production

 |
|||
|
|||
| BUILDING YOUR SWORD | |||
|
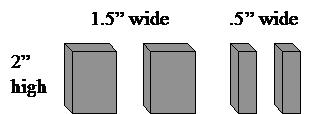
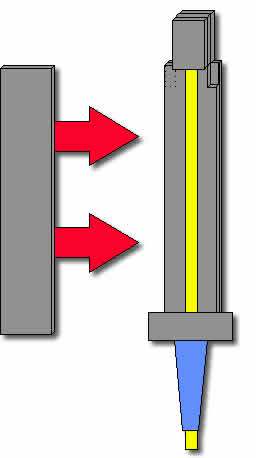
The first and perhaps most important step in constructing a Gilbert Sword is completion of what we call the “box”. This is a tape-reinforced section of foam that protects sword tip from being torn apart by the core. The addition of this box will triple the life span of any sword design. Begin by cutting out foam pieces of the following dimensions: |
|
||
|
|
|||
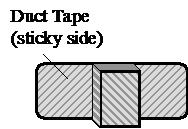
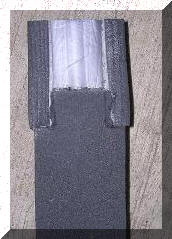
The next step is to cover each of these pieces with duct tape as follows. Cut pieces 2” long, the same length as duct tape is wide. In the picture to the right, the facing piece of foam is covered with a piece of duct tape that goes around the sides of the foam. A second and longer piece is attached to the back. The back will face out from the core. The facing side will face the core and be protected by the duct tape that covers it. Do all four pieces this way. |
|
||
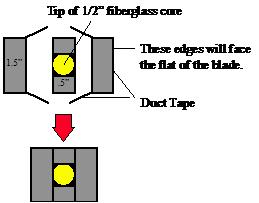
Adhere the duct-taped sections of foam to the tip of the core. They should be flush with the tip. Start by securing the ½” sections to either side, the secure the 1½” sections to either side, as demonstrated in the diagram to the right. The foam should be secured firmly, but not tightly. Try not to compress the foam when you apply it to the core with duct tape. It will be important later that the box be close to 1½” wide x 1½” thick x 2” long. Take care to keep it square.
|
 |
||
|
|
 |
||
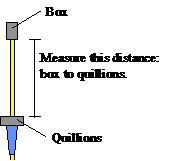
| Measure and cut out four pieces (right) based on these measurements. The two wide pieces are 2½” wide x the blade length from the box down. The two thin pieces are 1” wide x the same length. Get your glue out and stir it well. You’re ready to start gluing the blade. |

|
||
|
On gluing: ALWAYS use the glue liberally. So many would-be sword makers are careful not to overdo it. You should always put it on thickly and evenly, just so it isn’t dripping over the edges. And let it get nice and tacky, almost dry. In 75° temperatures, it may take as long as 15 minutes to tack up properly. Be patient: do it right the first time. |
|||
|
Apply the foam as described in the detail below. Be careful to keep the foam snug against the core, and use lots of glue. If your cuts were well measured, the edges of the blade should be flush when all three layers have been adhered. Gilbert notched in the inner slices as detailed below. It reinforces the joint between the lower and upper blade. We have an easier alternative, below. |
|||
|
|
|||
|
|
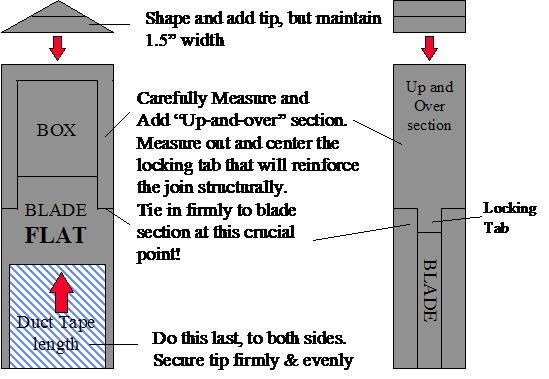
Once you have successfully glued all three layers of the lower blade to the core, set a piece of plywood over the whole thing and lay weights or books on that so that you have a nice, even, constant distribution of pressure across the entire blade length. Give the glue a day to dry, then you are ready for the next step. Cut a notch out of both sides of your blade (left). Cut a straight section down 1". You will then replace it with a 3" long 1.5" wide piece that runs from the notch to the top of the box. This serves to reinforce (as Sir Gilbert intended) without overcomplicating things with the locking tab detailed in the graphic below. |
||
|
When you have
completed the tip, run duct tape up the entire flat of the blade up to
the tip. |
|||
|
|
|||
|
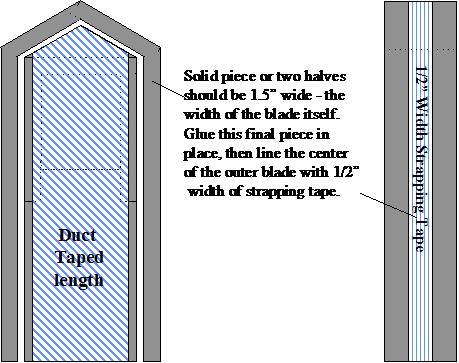
You're going to cut a a strip 1.5" wide by the the overall length up, over and around your sword. (Outer piece, below left) Measure the entire blade up and over the tip and back down the other side. You can do this with two pieces, but one is better. First make sure the blade edges are flush where the seams are, that you have a flat surface you can glue to. If not, carefully use a new razor to trim the edge, but not too much. Now glue the final outer edge into place. Remember not to stretch the foam as you glue it in place.
|
|||
| When it has dried, put a strip of ½” wide strapping tape up and over the entire outside section (edge) of the blade. (Above right) Keep it centered! Your blade is exactly 1½” thick. The strapping tape should cover only the center ½ inch. Now use a fresh razor to trim off the uncovered foam, resulting in a beveled edge. That means anything not covered by the duct tape on the flat, and the strapping tape on the edge. Cutting at an angle will give you a nice, finished appearance of a bladed sword. A beveled edge will also reduce the slapping effect of a wide sword edge, and give your victims more “progressive resistance” when you smite them. | |||
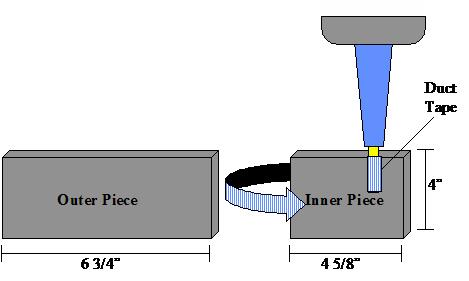
Easy pommel design: If you want to add a spherical Gladius pommel, first run several ½” strips of duct tape around the bottom of the core, keeping flush with the bottom edge. This builds up the ½” core because the foam will not stay wrapped so tightly as to conform to that circumference. Now cut 2
strips of foam that are 4” wide. One will be 4 & 5/8” long, the other
will be 6 & 3/4” long. Wrap the first and inner piece (yes, you have
found inner peace) snugly around the bottom of the core as detailed
below. Tape it firmly into place with a ½” wide piece of strapping or
duct tape. Secure the outer piece on around the first piece, but don’t
overlap the joints where the wrap comes full circle. Plug the hole in the bottom with a piece of closed cell and tape the whole thing up. Tape the cross guard too. |
|||
|
|
|||
|
Now cover your sword blade with gray or black cloth that is both light and durable, and secure it to the guard. When you have completed this, find a good friend and knock the crap out of him.
|
|||
|
|||

©1997-2005 Sean Richey. The sword design is Sir Gilbert's. He was generous in sharing his design with Rome and we have honored him with the credit he deserves. The instructions and graphics above are ours. Please feel free to link to our page, but do not reproduce it without permission.