|

Do you want to BE a Roman Gladiator? Legionary? Centurion? General?
Senator? We've been living your dream for years!
Be the Hero!
Live the Dream.
SITE
INDEX
This site is best viewed at 1024x768 Look
for us on
Malice
the Webseries, a Phil Cook Eagle Films Production
| |


|
Yes, it’s time to make a javelin! All of us
should own at least one. Javelins are the most essential at Dagorhir because
they penetrate armor. Our skill with them is the big equalizer, and has won us
battles in the past. Dagorhir-legal javelins are the most difficult to make.
Why? They have to be safe for impact against the head, and they have to weigh
in at under 1.5lbs. We are Romans. Every Roman soldier (depending on the time
period) carried at least two javelins into battle. If each of us had a javelin,
we would be even more tactically devastating than we are now. This helps you at
least as much as it helps Rome. You get to enjoy the luxury of reaching out to
touch someone. Construction is easy. One javelin should take no longer than an
hour.
YOU WILL NEED:
1 5’x½" Fiberglass Rod (Golf course
flag poles are perfect)
2 3"x1"x½" sections of Closed Cell Foam
2 9"x4"x2" pieces of Open Cell Foam
1 12"x4"x2" piece of Open Cell Foam (I
recommend Computer Packing Foam)
4 3’ lengths of Pipe Insulation
2 12"squares of Yellow and Black Fabric for covers.
Roll of Duct Tape (duh!)
1 Exacto Knife with a new razor blade.
1 Can of Weldswood Contact Cement (Optional)
2 12"square Black and Yellow Fabric for covers
|
Once you have gathered
the necessary materials, you are ready to begin. Wrap the ends of
your fiberglass rod with duct tape. This helps to prevent it from
pushing through the foam later. If one of our javelins becomes
unsafe, they will all be suspect. Then cut your two pieces of Closed
Cell foam into roughly diamond shapes and apply them to both ends
with duct tape as demonstrated in Figure 1 on the right..
|
Figure 1
|
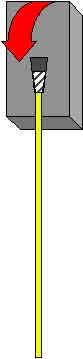
Figure 2
|
In Step two, you will be
applying the smaller sections of Open Cell Foam to both ends of your
javelin. I highly recommend that you use 2" thick computer
packing foam. It lasts much longer and never gets that squishy quality
that standard upholstery foams degrade into. The trick to constructing
a safe javelin is in the application of the Open Cell Foam. NEVER pull
down on the foam. You want to gently fold it up and over the tip of
the javelin, as demonstrated in figure 2.
Figure 3 details how the
duct tape should be used to secure the first layer of your Open Cell
Foam. ALWAYS start wrapping at the bottom (where the foam meets the
rod). It helps to have someone hold the foam in place for you when you
start. Working from the bottom bunches the foam towards the tip to
protect the person you will be nailing in the face. That’s good.
|

Figure 3
|
Wrap the foam tightly
with duct tape, just past the fiberglass core. See that section of
white in Figure 3? It is right between the dark gray of the Closed
Cell foam and the lighter gray of the Open Cell. This is not a
mistake in the graphic. There should be a tiny gap there as the
result of wrapping from the bottom. That’s perfect, provided the
tip doesn’t move back and forth appreciably. Repeat this step for
both ends of the javelin
|
Your final step in
the process of constructing your safe javelin tip is to apply the
last layer of Open Cell foam over the safest end. Remember to gently
fold the Open Cell foam up and over the tip. This step is basically
identical to the previous one, except that this piece of Open Cell
foam must be considerably longer in order to cover the previous
layer and still extend down to fiberglass rod. As before, wrap the
duct tape tightly from the core up. The duct tape will extend well
past the position of the core. As displayed in Figure 4, the duct
tape should extend almost to the top of the previous layer of Open
Cell foam, but not beyond it. Again this method of wrapping from the
bottom forces the foam to bunch at the top. This ensures the key to
safety. That key, to coin an old Dagorhir expression, is PROGRESSIVE
RESISTANCE. This means that the foam layers become increasingly firm
as you press towards the core.
Having completed the
tip, you are ready to pad the shaft. Use the pipe insulation for
this. Measure the length to fit. Pipe insulation is 3’ long, so
you'll need two pieces to completely cover the javelin's shaft. A
second layer of pipe insulation along the shaft makes it safer and
longer lasting. I recommend that you cut a slice out of the first
layer and actually glue it to the fiberglass core. Why? It keeps the
foam from sliding back and forth and increases your control over the
entire length. Cover each layer with duct tape, and secure it to the
tip and butt.
|
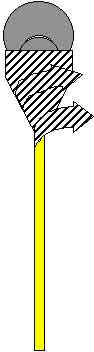
Figure 4
|
Once this is achieved,
you are ready to cover both ends in cloth. Dagorhir has a rule that
the striking tip must be covered in bright yellow cloth for easy
identification, and this rule has been strictly enforced in recent
years by Dagorhir's very conscientoius Weapons Checkers. Cover the
butt in black, red or gray cloth so as to prevent confusion. Write
your name on the yellow tip so that you (and your opponents!) know
which javelin is yours.
Tip #1: Never
use your javelin like a walking stick. More importantly, never
use MY javelin like a walking stick! Why? It compresses the foam
at the butt, and you’ll find your weapon failing before its
time. Your weapons will always last a lot longer if you baby
them. Keep them dry and in a warm place. Never stack armor or
heavy objects on top of them.
Tip #2: Romans
called a javelin a pilum. Gurrundi Pontifex Maximus will tell
you this was pronounced "PEE-loom". I certainly don’t
feel comfortable saying that in public. I much prefer "PIE-lum".
Sorry, Gurrundi! This is a prime example of an Americanized
pronunciation being far more dignified than the Latin.
-Allaricus Xirinius
Dominus
|
|
|
|
|
|
|
|
|
|
|
|
|
|
|
|
|
|